Performance toolkit
All the theory and tools you need to build a performent website.
I’ve been working a lot on web performance lately and was asked to give a talk about it. I was highly inspired by Paul Lewis and decided to talk about how to improve your user perception, how to speed up your animations, how to boost your loading time and finally, how to test your results.
This post is a transcript of the slides of the talk.
There are heaps of reasons you should be concerned about your application performance. In addition to being secure and fast, users want your app to be fast. Here are some interesting data:
- 47% of users expect page load < 2 seconds.
- 40% abandon websites that take more than 3 seconds to load.
- 79% of shoppers are less likely to buy from a slow website.
- People still browse on poor mobile connections.
- Page speed is a part of Google’s ranking algorithm.
Even though most of our computers are now powerful, we should not forget to think about optimization.
Our goal will be to make our app more reactive and responsive to user’s actions in order to improve his experience. We’ll see during this article that it’s all about the user and its perception.
“Focus on the user and all else will follow.” — Google
Understanding user perception
Before speeding up our applications, we need to define what is “slow”. We often hear people saying that their feeling about the experience is slow, but it actually depends on the context.
10ms is nothing when browsing an eCommerce website, we wouldn’t feel any sort of disturbance. However, when it comes to a video game, 10ms is huge and should be avoided.
The real question is, therefore: what does the user feel?
User reaction on loading time
Studies found out several user reactions according to the delay of an action.
| Delay | User reaction |
|---|---|
| 0 - 100 ms | Instant |
| 100 - 300 ms | Slight perceptible delay |
| 300 - 1000 ms | Task focus, perceptible delay |
| 1000+ ms | Mental context switch |
Google introduced a new concept that considers these results in order to get the most of the user perception.
Introducing RAIL
RAIL stands for Response, Animation, Idle, Load. It’s a concept that sums up the actions that we should run during a very precise time.
- Response (100ms), to bring something back on screen so the user feels a response instantly.
- Animation (16ms) for scroll, gesture and transitions so visual changes feel smooth and consistent.
- Idle (50ms), to work on the background so the next user interaction is responsive.
- Load (1000ms), to deliver the experience so the user’s flow is seamless.
This theory simply sets up what we need to reach. But how to achieve these goals?
Speed up your animations
Devices today refresh their screen 60 times a second (60Hz). Every time a motion (animations, transitions or scrolling) appears, the browser should match the refresh rate by putting up a new frame. We, therefore, need to reach 60 frames per second.
Each of these frames has a budget of approximately 16ms (1 second / 60 frames = 16.66ms). If our motion is computed in more than 16ms, we fail to reach this budget and call this phenomenon a jank. This stuttering means that our app isn’t keeping up with the refresh rate and will negatively impact our user’s experience.
In order to reach this goal, we’ll first need to understand how the browser paints pixels.
Pixels are expensive
When your browser displays pixels on your screen, it proceeds in five major steps. Mastering these layers is going to be the key point of speeding up your future animations.
![]()
- JavaScript. Handles work that will result in visual changes.
- Style. Figures out which CSS rules apply to which elements.
- Layout. Calculates how much space it takes up and where it is on screen.
- Paint. Draws out surfaces and fills in pixels.
- Composite. Draws to the screen in correct order.
This pipeline acts like a cascade, the more layers triggered, the heavier for the browser to render. Layout depends on paint and compositing, paint depends on compositing and finally, compositing does not trigger any other elements.
The compositor is the cheapest and most efficient for high-speed animations.
Animate efficiently
Stick to compositor-only properties
If your goal is to reach 60 frames per second, you should only animate CSS properties that trigger compositing.
/* Position */
transform: translate(npx, npx);

/* Scale */
transform: scale(n);

/* Rotation */
transform: rotate(ndeg);

/* Skew */
transform: skew(X|Y) (ndeg);

/* Matrix */
transform: matrix(3d) (...);

/* Opacity */
opacity: 0.1;Promote your animations
Your browser can manage different layers like Photoshop or Sketch would. The benefit of this approach is that elements can be handled without affecting other layers. This means that there’s no need to repaint or recalculate positions of other elements when you animate an element in its own layer.
To create a new compositor layer, you can use the will-change CSS property.
.animated-element {
  will-change: <property>; /* where <property> stands for "transform", "opacity", etc. */
}
will-change tells the browser that changes are incoming and it can then make previsions on making things faster.
This new property is the equivalent to the old hack:
.animated-element {
  transform: translateZ(0);
}
However, don’t create too many layers; each requires memory and management. Only promote relevant elements that you plan to animate.
FLIP your animations
FLIP stands for First, Last, Invert, Play and was introduced by Paul Lewis. His method aims to run animations at 60 frames per second by precalculating the motion.
- First. The initial state of the element involved in the transition.
- Last. The final state of the element.
- Invert. Figure out from the first and last how the element has changed.
- Play. Switch on transitions for any of the properties you changed, and then remove the inversion changes.
// Save the element in a variable
const circle = document.getElementById('circle')

// Get its position at the initial state
const firstPosition = circle.getBoundingClientRect()

// Move it to its final state
circle.classList.add('is-final')

// Get its position at the final state
const lastPosition = circle.getBoundingClientRect()

// Compute the reverse motion
const invertTop = firstPosition.top - lastPosition.top

// Animate from the inverted position to the last
const player = circle.animate(
  [
    {
      transform: `translateY(${invertTop}px)`,
    },
    {
      transform: 'translateY(0)',
    },
  ],
  {
    duration: 700,
    easing: 'ease-in-out',
  }
)The whole point of FLIP is to reduce the per-frame complexity and cost by calculating the animation in JavaScript, and letting CSS handle it.
Boost your page load time
Compress your data
Images
- Use the right format (PNG, GIF, JPG). Prefer videos over GIFs.
- Compress your images
- Use thumbnails instead of HTML resizing
- Use CSS effects instead of images
Files
- Lazy load everything
- Minify your JavaScript files
- Inline your JavaScript and CSS files
- Concatenate your files
- Load your files asynchronously
- Load only relevant scripts (don’t load desktop specific stylesheet on mobile)
GZIP compression
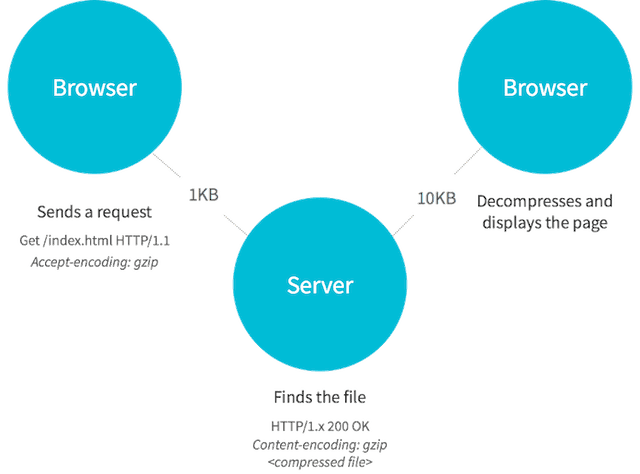
GZIP compression is an effective way to save bandwidth and improve download time. The server sends a compressed file to the browser (index.html.zip), the browser downloads the zipped file, extracts it and shows it.

To activate GZIP compression in Apache, you will only have to edit your .htaccess file.
AddOutputFilterByType DEFLATE text/plain
AddOutputFilterByType DEFLATE text/html
AddOutputFilterByType DEFLATE text/xml
AddOutputFilterByType DEFLATE text/css
AddOutputFilterByType DEFLATE application/xml
AddOutputFilterByType DEFLATE application/xhtml+xml
AddOutputFilterByType DEFLATE application/rss+xml
AddOutputFilterByType DEFLATE application/javascript
AddOutputFilterByType DEFLATE application/x-javascriptGo offline with service workers
Today, there’s no reason not to offer an offline experience to your user. A service worker is a script run by the browser in the background. It can’t access the DOM, but acts like a programmable network proxy.
Moreover, a service worker has the ability to intercept and handle network requests, that is to say, to manage a cache of responses. That’s the functionality we’re going to use to make our app available offline.
A service worker can only work over HTTPS and through localhost.
Service worker lifecycle
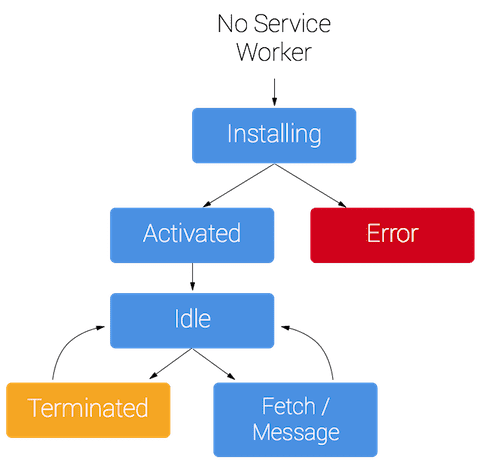
The service worker’s lifecycle is completely separate from the web page. It will be terminated when not in use, and restarted when necessary.

The three steps that we’re going to follow are registering the service worker, installing it, caching and returning requests.
Register the service worker
You need to register your service worker first. It will tell the browser where your service worker JavaScript file is located. Here, the file’s name is service-worker.js and is in the root folder. This allows its scope to be the entire origin.
Before registering it, you have to test if serviceWorker is supported by the browser. If it’s not, it will simply ignore everything that follows.
if ('serviceWorker' in navigator) {
  navigator.serviceWorker
    .register('/service-worker.js')
    .then(navigator.serviceWorker.ready)
    .then((registration) => {
      console.log(
        'Service Worker has been registered with scope: ',
        registration.scope
      )
    })
    .catch((err) => {
      console.error('Service Worker registration failed: ', err)
    })
}Install the service worker
You will need to specify the files you want to cache and to define a cache name. If any of the files fail to load, the whole install step will fail. Make sure not to cache too many files so your worker is reliable.
const CACHE_NAME = 'app-cache-v1'
const CACHE_URLS = ['/', '/styles/main.css', '/scripts/main.js']

self.addEventListener('install', (event) => {
  event.waitUntil(
    caches
      .open(CACHE_NAME)
      .then((cache) => {
        cache.addAll(CACHE_URLS)
      })
      .catch((err) =>
        console.error("Couldn't install the service worker:", err)
      )
  )
})Cache and return requests
After the installation, the service worker will begin to receive fetch events. For all caches that the service worker created, it will find any cached file that matches the request.
If we have a matching response, we returned the cached value. Otherwise, we send a new fetch event and return its value, which will retrieve the data from the network.
self.addEventListener('fetch', (event) => {
  event.respondWith(
    caches
      .open(CACHE_NAME)
      .then((cache) => cache.match(event.request))
      .then((response) => {
        if (response) {
          return Promise.resolve(response)
        } else {
          return fetch(event.request).then((res) => {
            if (res && res.status === 200) {
              caches.open(CACHE_NAME).then((cache) => {
                cache.put(event.request, res)
              })
            }
            return res.clone()
          })
        }
      })
  )
})All applications should now work offline-first, and then retrieve the data from the network. This would offer an instant and reactive experience to the user. This is a step to making your app progressive.
Test your app
Now that we know how to make our app fast and reactive, how can we actually test the performance?
There are several tools online, and the more you use, the better. However, I’ll introduce you to two tools that belong to my daily workflow.
PageSpeed Insights
PageSpeed Insights is a super simple tool by Google. You only need to fill your website URL and it sums up a bunch of statistics and possible improvements for you.

The interface splits into two different tabs for Mobile and Desktop. For each platform, it tells you what should be fixed, what you should consider fixing and what you did well. There’s also some useful User Experience advice to improve the accessibility of your app.
Finally, a score is attributed to each different section. The recommended speed score is 85 on mobile and 90 on desktop.
WebPageTest
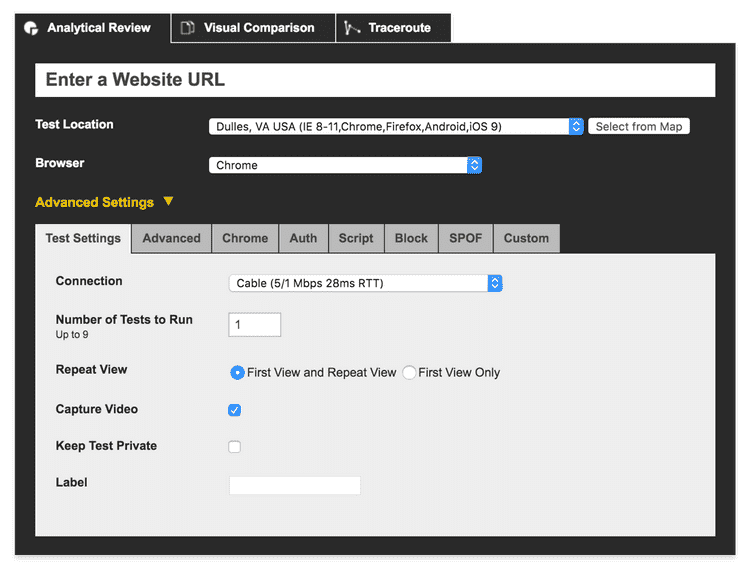
WebPageTest gives you so much information depending on the location and the browser on select.

This tool is useful to know the load time of your first view but also tests the repeat view.

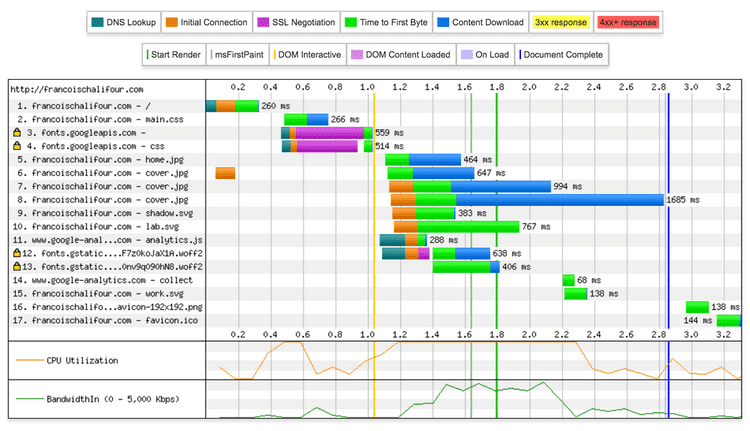
From here we can see that the main element that slows the site down is the use of CDN to load the font. It blocks a part of the rendering for almost 600ms. An image also takes a long time to load and should probably be more compressed.
What’s next
Progressive Web Apps are a way to deliver an app-like user experience. Their goals is to make the app feel native. We already reached the first step here by making the application work offline, but there’s much more to do: push notifications, web app manifest, splash screen, theme color, add to home screen…
I believe web design has gigantly improved lately but we have to find an acceptable compromise between design and performance (hello/goodbye Parallax!). We encounter the same problem with very heavy GIFs (videos are made for animated frames, not images!).
I hope this talk/article was useful for some people interested in Web Performance. If there’s one thing to remember: focus on the user.